Quantcast
Channel: BPMN 2.0 / Flowable
Viewing all 55 articles
Browse latest View live

Mule 3 released

$
0
0
It maybe a bit strange to start of this blog with a post about Mule, but the release of version 3.0 of the Mule community edition is certainly a valid reason.

It's been a while since I wrote the book Open-source ESBs in Action with Jos Dirksen. But the coverage of Mule in that book was based on Mule 2.x, which was the current version until a few weeks. In the last couple of years other open source integration frameworks like Apache Camel and Spring Integration came along and provided similar functionality. With version 3.0 Mule steps up again and provides great additional functionality with foremost the following features: hot deployment, new flow based architecture, annotation support and better support for web services and rest.

I want to highlight two features of Mule 3.0 in this post, which are the new flow based architecture and hot deployment. Previous versions of Mule had a service based architecture to implement your integration logic. The following picture taken from the Mule userguide describes it in a very easy manner.

As the picture shows, integration logic was implemented via an inbound router to process incoming messages, via a service component to implement additional processing logic, and an outbound router for sending the message along the path. In XML this looked liked the following snippet:

<service name="hello">
  <inbound>
    <jms:inbound-endpoint queue="hello.in"/>
  </inbound>
  <component class="org.mule.TestComponent"/>
  <outbound>
    <pass-through-router>
      <jms:outbound-endpoint queue="hello.out"/>
    </pass-through-router>
  </outbound>
</service>

Nothing wrong with this kind of architecture, but it becomes a bit tricky when you have to specify all kinds of transfers, multiple component classes etc. The new flow based architecture solves these issues and provides a very clean and flexible architecture based on message processors and sources to implement your integration logic (see the following figure taken from the userguide).

All the things you want to do with a message after it has arrived at a message source is implemented with message processors. So transformers, routers and custom logic are all message processors. This makes it very clean and easier to understand. The new flow based architecture looks like this in XML:

<flow name="hello">
  <jms:inbound-endpoint queue="hello.in"/>
  <component class="org.mule.TestComponent"/>
  <jms:outbound-endpoint queue="hello.out"/>
</flow>

This looks very simple doesn't it? For a very small example like I've implemented here, the differences are not huge of course. But you can imagine that for more complex examples, the new flow based architecture makes your life a lot easier.

The other huge improvement in Mule 3.0 is hot deployment. One of the main differences between Apache ServiceMix and Mule when we wrote the Open-source ESBs in Action book was a hot deployment feature from an enterprise perspective. And now with version 3.0 it's there and looks very promissing. In the apps directory of the Mule installation you can now deploy a Mule configuration and JARs (if necessary) and Mule picks it up automatically. Then, if you want to change the Mule configuration you can simply update the file and again Mule picks it up automatically. For more information you can look at the userguide. Hot deployment now works for a lot of implementations, but there is still some room for improvement. For example, only the main Mule configuration file is monitored by Mule, not its child Mule configurations. When compared to other open source ESBs like Apache ServiceMix and Open ESB, I see that Mule takes a web application like approach to hot deployment, where the others use OSGi.

So to summarize, version 3.0 is certainly a step forward! It provides a lot of improvements and some great new features including the discussed hot deployment and the new flow based architecture. And from a perspective of the open source BPM Activiti project I'm enthousiastic about the possibilities of integration between Mule and Activiti. So I hope to see Activiti integration in the next 3.x version of Mule.

BPMN 2.0 with Activiti - book order tutorial

$
0
0
Step 1 - Implementing a Java Service Task

In a small series of posts we will show how to get started with
Activiti BPMS by getting a simple book order process running on Activiti Engine. All the BPMN 2.0 constructs that the Activiti Engine currently supports will be addressed in the coming few weeks. Today an easy start with the Java Service Task.

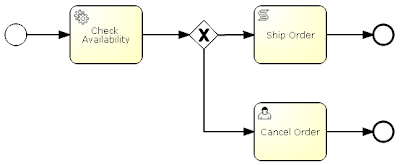
Let's first take a look at the simple version of the bookorder process modeled with the Activiti Modeler tool:

After filling out the title of a book in an order form with Activiti Explorer a process instance is created. Then a Java Service Task checks if the ordered book is available and depending on the outcome of that check the process routes the order, via an exclusive gateway, to a Groovy Script Task to start the shipping process or, when the book turns out to be unavailable, a User Task is created to cancel the order.

Lets take a look at the Java Service Task. We will use this task to implement the availability check in our process. The Activiti Engine executes a Java Service task by calling the execute method on a class that implements the ActivitiBehaviour interface. The CheckAvailability class below does this by extending the BPMNDelegation convenience class from the Activiti API. In the code you can see that an ActivityBehavior instance has access to the current state of the process through the ActivityExecution that is passed in as a parameter of the execute method.
public class CheckAvailability extends BpmnJavaDelegation {

public void execute(DelegateExecution execution) {
String bookTitle = (String) execution.getVariable("bookTitle");
boolean bookAvailable = false;
if (bookTitle.equalsIgnoreCase("BPMN 2.0 with Activiti")) {
bookAvailable = true;
}
execution.setVariable("bookAvailable", bookAvailable);
}
}
The execute method takes a process variable from the execution, checks its value and depending on the outcome it sets another variable, called bookAvailable, on the execution. Let's test this with a simple BPMN 2.0 process in eclipse. Take a look at the process below.

<process id="bookorder">
<startEvent id="theStart"/>
<sequenceFlow id="flow1" sourceRef="theStart"
targetRef="checkAvailability" />
<serviceTask id="checkAvailability" name="Availability Check"
activiti:class="org.bpmnwithactiviti.CheckAvailability" />
<sequenceFlow id="flow2" sourceRef="checkAvailability"
targetRef="waitState" />
<receiveTask id="waitState" />
<sequenceFlow id="flow3" sourceRef="waitState" targetRef="theEnd" />
<endEvent id="theEnd" />
</process>
Right after the process will be started the engine reaches the CheckAvailability servicetask, which is implemented by the CheckAvailability class. After execution of the task the engine moves on to the waitstate. There the engine will give control away, waiting to be signalled by the outside world to move on. We will see later how we can signal a process with for example a user task, for now this task is only there so we can test the values of the 'bookAvailable' variable. Without the waitstate activity the process would end after execution of the service task and there would be no process to check the variables of to perform the test.

The ActivitiRule, a convenience class for ProcessEngine and services initialization in the form of a JUnit rule, is used to setup the engine with the activiti-mem.properties file. It will configure the engine with an in-memory H2 database so we can test locally in our eclipse environment. From the ActivitiRule the RuntimeService is retrieved to create an instance of the bookorder process that is deployed thanks to the @Deployment annotation. Later the bookTitle is set after an order form is completed, but in this test we will start the process with a processVariables map containing the booktitle.

public class JavaServiceTaskTest {

@Rule
public ActivitiRule activitiRule = new ActivitiRule("activiti-mem.properties");

@Test
@Deployment(resources={"bookorder.javaservicetask.bpmn20.xml"})
public void bookAvalaible() {
Map processVariables = new HashMap();
processVariables.put("bookTitle", "BPMN 2.0 with Activiti");
ProcessInstance pi = activitiRule.getRuntimeService()
.startProcessInstanceByKey("bookorder", processVariables);
processVariables = activitiRule.getRuntimeService()
.getVariables(pi.getId());
assertEquals(true, processVariables.get("bookAvailable"));
}
}

That is all there is to it. In the next part we will add a form to the process to be able to enter a book title. After the form is added our enhanced process will be packaged in a bar file and deployed to an Activiti Engine instance running on Tomcat so we can start the process from the Activiti Explorer tool.

That is it for now. The code of the BookOrder project can be checked out from the Google Code repository. There are more usage examples of the Java Service Task there showing how to inject fields in the CheckAvailability class and how to use expression in BPMN to inject these fields dynamically.

BPMN 2.0 with Activiti - book order tutorial (2)

$
0
0
Step 2 - Adding a start form to the process

In a small series of posts we will show how to get started with Activiti BPMS by getting a simple book order process running on Activiti Engine. All the BPMN 2.0 constructs that the Activiti Engine currently supports will be addressed in the coming few weeks.

In the process model below you can see the Java Service Task that was implemented in the previous post. That time the 'bookTitle' variable was set from within a unit test, today we will add a start form to the process which lets a user fill in a book title in the Activiti Explorer.

Before we start working with eclipse, to define the process and the form, install Activiti. In this example the beta 2 release of Activiti is used. Download it and unzip the file in a directory. Check out the user guide for more information, but for now it is enough to run the ant demo.setup task to get the engine running. When ant is all done a Tomcat distribution is downloaded and started and the Activiti apps are installed.

With Tomcat running silently in the background it is time to open eclipse. Since the BPMN 2.0 spec does not specify how task forms should be rendered, forms are defined in the bpmn xml file using Activiti specific constructs. The xml below shows how to add the bookorder.form to the start event in the book order process.
<process id="bookorder">
<startEvent id="theStart" activiti:form="bookorder.form"/>
<sequenceFlow id="flow1" sourceRef="theStart"
targetRef="checkAvailability" />
<serviceTask id="checkAvailability"
name="Availability Check"
activiti:class="org.bpmnwithactiviti.CheckAvailability" />
<sequenceFlow id="flow2" sourceRef="checkAvailability"
targetRef="waitState" />
<receiveTask id="waitState" />
<sequenceFlow id="flow3" sourceRef="waitState"
targetRef="theEnd" />
<endEvent id="theEnd" />
</process>
The task forms that can be rendered by the Activiti Explorer are just plain html files. By convention they have the .form extension. The form that we are going to use is very simple and just has an inputfield to enter the title of the book that we want to order. The variable in the form, in this case the 'bookTitle' variable, will be stored as process variables after completion of the task. The variables must be camel-cased. Currently supported are String, Integer, Boolean and Date, String is the default type.
<h1>Book Order</h1>
<table>
<tr>
<td>
<label>Book title:
<input type="text" name="bookTitle" value="" />
<input type="hidden" name="bookTitle_required" value="true" />
<input type="hidden" name="bookTitle_type" value="String" />
</label>
</td>
</tr>
</table>
Now that the form and the bpmn xml is ready we can package these files in a business archive, the deployable unit on Activiti Engine. This you can do by exporting the eclipse project with the jar file export wizard. Select only the bpmn xml file and the form and name the file bookorder.bar. To deploy the archive we will create a simple J2SE class with a main method.
public class BarDeployer {
public static void main(String[] args) throws Exception {
ProcessEngine processEngine = new ProcessEngineBuilder()
.configureFromPropertiesResource("activiti.properties")
.buildProcessEngine();
RepositoryService repositoryService = processEngine.getRepositoryService();
String barFileName = "bookorder.bar";
ZipInputStream inputStream = new ZipInputStream(new FileInputStream(barFileName));
repositoryService.createDeployment().name(barFileName)
.addZipInputStream(inputStream).deploy();
}
}
Note that we now use a different activities.properties file to build the process engine. Since deployment will take place on the Activiti Engine installation running on Tomcat a different config is needed than the one used in our previous unit test.

Now that the bar file is deployed you can see the installed bookorder process with Activiti Explorer on http://localhost:8080/activiti-explorer/. Login as kermit with password kermit and take a look at the processes he can start. On the top of the list you see the Book Order process.

Before you can start the process you need to deploy a jar file that contains the CheckAvailability class file in the Tomcat lib directory and restart Tomcat, otherwise the engine can't find the class that implements the Java Service Task we build in the previous post.

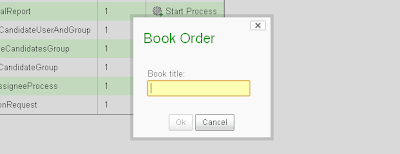
Note that the Action behind the Book Order process is not 'Start Process' but 'Start Form'. Only when we have put in a book title in the form and pressed the 'Ok' button a process instance is created and the 'bookTitle' variable is set.

When you submit the form you can see some logging appearing in de Tomcat log file telling you whether the book is available or not. The code of the BookOrder project, including the bar and jar file, can be checked out from the Google Code repository.

That was it for now, next time we will take a look at gateways!

Using Activiti's email task

$
0
0
In a small series of posts we show how to get started with Activiti BPMS by getting simple processes running on Activiti Engine. Today an Activiti specific construct will be addressed; the email task. To demonstrate this task we build a very small one-step process with Activiti's rc1 release and test it in Eclipse.

Before we can do that we need to set up a mail server first. We will use the Apache James project to do that. Download Apache James from http://james.apache.org and unzip de file in a directory of choice. We are not going to do anything very secure in this example so we will use the default setup. You can start the server by executing the run.sh or run.bat file in the james_install_dir/bin directory.

After the server is up and running smoothly in the background we need to add a user account so we have somebody to mail to from the process. Start a telnet session with localhost on port 4555; you can login with the preconfigured root user, password root. Then add a user with the following command:

Adduser miss.piggy piggy

A user called miss.piggy is added with the email address miss.piggy@localhost and the password piggy. To check if Miss Piggy’s account is actually added you can execute the listusers command to verify. The screenshot below gives a view on the telnet session to summarize things.

That is all there is to it. The James mail server is configured correctly and waiting to receive mails on port 25. Back to Activiti!

Now that our mail server is up and running smoothly we are ready to declare an email task in the BPMN 2.0 XML file. For the detailed information concerning different configuration options for the email task within Activiti you can check out the Activiti user guide. We will stick to the basics for the moment and create a simple standalone process that sends an email to the customer to test the mail server configuration.

<process id="simpleEmailProcess" >
<startEvent id="theStart" />
<sequenceFlow sourceRef="theStart" targetRef="sendMail" />
<serviceTask id="sendMail" activiti:type="mail">
<extensionElements>
<activiti:field name="to" expression="${recipient}"
<activiti:field name="subject">
<activiti:string>Hello ${name}!
</activiti:field>
<activiti:field name="html">
<expression>
<![CDATA[
<html>
<body>
Hello ${name},<br/>
Just saying hi!<br/>
Kind regards,
Me.
</body>
</html>
]]>
</expression>
</activiti:field>
</extensionElements>
</serviceTask>
<sequenceFlow sourceRef="sendMail" targetRef="theEnd" />
<endEvent id="theEnd" />
</process>

You can now run the process as we have done before within Eclipse, for example with a unit test. Make sure you deploy the BPMN 2.0 XML file correctly in the test and set up a process variables map with the name and recipient variable before you start the process from the code. Take a look at the JavaServiceTaskTest code in an earlier blog if you need a reminder of how to do this. Make sure that the mail server port in the activiti.cfg.xml file is configured for port 25.

When you are done, run the test. After the process is finished you should have received an email in the james_install_dir/apps/james/var/mail/inboxes/miss.piggy directory. To view the email you can install an email client like for example Mozilla Thunderbird. James is using the default ports in the standard setup, so you only have to configure Miss Piggy’s account.

That is all there is to it! Next time a look at gateways and event listeners..

Activiti Spring integration example

$
0
0
A few days ago Activiti 5.0 was released; an apache licensed clean, fast, rock-solid and easy to use business process management suite. In this post the powerful Spring integration that comes with Activiti is demonstrated with a small example. The Spring integration layer makes the Activiti engine available for use inside a Spring container and provides functionality to invoke Spring beans directly from service tasks and gives you all the Spring comfort with Activiti, like for example dependency injection and transaction support.

Let's work out an example now to show you how Spring's transaction support can be used together with Activiti and to demonstrate how you can use Spring beans in a BPMN 2.0 process. In the example the in-memory h2 database that is shipped with Activiti, is used to configure Activiti. We will declare a Spring bean in the definition of the BPMN2.XML to perform a service task and next to that another Spring bean, not used by the process itself, that will perform transactional functionality. Within the transaction the bean is using the Activiti API to start a process instance. Take a look at the code to see the bean with the transactional method we want to perform.

public class SomeBean {
private RuntimeService runtimeService;

@Transactional
public void doTransactionalStuff(boolean error){
runtimeService.startProcessInstanceByKey("springTransactionTest");
if(error){
throw new UnsupportedOperationException("Rollback needed!!");
}
}

public void setRuntimeService(RuntimeService runtimeService) {
this.runtimeService = runtimeService;
}
}


As we will see in a bit in the Spring configuration the RuntimeService instance attribute of SomeBean is injected by Spring. The method we are interested in is the doSomeTransactionalStuff method. It takes a boolean error parameter and based on its value it will throw a UnsupportedOperationException or move on after having started a process instance of the springTransactionTest process. The UnsupportedOperationException is a runtime exception that will force Spring to rollback the transaction when it is thrown, ensuring as well that the process instance will not be stored in the Activiti h2 database.
Take a look at the Spring configuration needed to run this example.

<beans>
<bean id="dataSource"
class="org.springframework.jdbc.datasource.TransactionAwareDataSourceProxy">
<property name="targetDataSource">
<bean class="org.springframework.jdbc.datasource.SimpleDriverDataSource">
<property name="driverClass" value="org.h2.Driver" />
<property name="url" value="jdbc:h2:mem:activiti;DB_CLOSE_DELAY=1000" />
<property name="username" value="sa" />
<property name="password" value="" />
</bean>
</property>
</bean>

<bean id="txManager"
class="org.springframework.jdbc.datasource.DataSourceTransactionManager">
<property name="dataSource" ref="dataSource" />
</bean>

<tx:annotation-driven transaction-manager="txManager"/>

<bean id="processEngine" class="org.activiti.spring.ProcessEngineFactoryBean">
<property name="databaseType" value="h2" />
<property name="dataSource" ref="dataSource" />
<property name="transactionManager" ref="txManager" />
<property name="dbSchemaStrategy" value="create" />
<property name="deploymentResources"
value="classpath*:spring.test.bpmn20.xml" />
</bean>

<bean id="runtimeService" factory-bean="processEngine"
factory-method="getRuntimeService" />

<bean id="someBean" class="org.activitiinaction.SomeBean">
<property name="runtimeService" ref="runtimeService" />
</bean>

<bean id="someOtherBean" class="org.activitiinaction.SomeOtherBean" />

</beans>

You see the declaration of the in-memory h2 datasource, followed by the declaration of a transaction manager of type DataSourceTransactionManager that is tight to the defined datasource. Then we declare that the transaction manager is annotation driven and define the processEngine and runtimeService beans that will be used in the unit test and in SomeBean. Note that the deploymentResources property is used to point to the location of our example process. Finally the SomeBean is declared getting the runtimeService bean injected in its runtimeService attribute as well as SomeOtherBean, the implementation of the BPMN service task, that will be called by the process. In defining it we are using an Activiti expression.

SomeOtherBean is just a pojo with one simple method. There is nothing more to it, and it can be directly used in the process.

public class SomeOtherBean {

public void doSimpleStuff(){
System.out.println("In SomeOtherBean doingSimpleStuff");
}

}

The example process is straightforward. Besides the service task performed by SomeOtherBean, only writing some console output, it contains a single user task just for the reason we mentioned in earlier posts. In order to query the process engine database we need to put the process in a wait state. With only an automated task the process would simply end, so the user task keeps the process instance alive. The whole process declaration is shown below.

<definitions>
<process id="springTransactionTest">
<sequenceFlow id="sequenceflow1" sourceRef="start"
targetRef="simple" />
<serviceTask id="simple"
activiti:expression="#{someOtherBean.doSimpleStuff()}" />
<sequenceFlow id="sequenceflow2" sourceRef="simple"
targetRef="userTask" />
<userTask id="userTask" />
<sequenceFlow id="sequenceflow2" sourceRef="userTask"
targetRef="end" />
<endEvent id="end" name="End" />
</process>
</definitions>

Note how Activiti leverages Spring to use the SomeOtherBean instance declared as a Spring bean earlier on. Because we run the Activiti engine within the Spring container, we can directly reference Spring beans from a service task. In the service task doSimpleStuff() is called, in this case, to print a statement to the console.

In the code needed to test all this we will call upon a SomeBean instance to let it perform some transactional stuff. We call the bean twice. Once with a error value of false and the second call will have an error value of true. Take a look at the code.

@RunWith(SpringJUnit4ClassRunner.class)
@ContextConfiguration("classpath:spring-test-application-context.xml")
public class SpringTest {

@Autowired
private RuntimeService runtimeService;

@Autowired
private SomeBean someBean;

@Test
public void simpleProcessTest() {
try {
someBean.doTransactionalStuff(false);
someBean.doTransactionalStuff(true);
} catch (RuntimeException re) {
System.out.println("Catching RuntimeException for testing purposes..");
}
assertEquals(1, runtimeService.createProcessInstanceQuery().count());
}
}

As you can see, the unit test is really simple since we don’t have to create the Activiti engine ourselves. With the standard Spring annotations @RunWith and @ContextConfiguration, the Spring configuration we defined is used as part of this unit test. The @Autowired annotation let's the Spring container inject an instance of the RuntimeService in the test as well as a SomeBean instance.

When you run the test you will see that two process instances are started. When the SomeBean's doTransactionalStuff() is called with a true value for the error parameter though, SomeBean throws a RuntimeException. This forces Spring to rollback the running transaction and will not commit the process state to the Activiti database. The test makes sure that all this went right, so it checks that indeed only one process instance is returned as the result of the process instance query on the Activiti DB.

Next time I will post a small example about deploying Activiti in Apache Karaf to show how you can use Activiti in a OSGI container.

To be complete below follows the pom.xml if you want to create the example yourself:

<project xmlns="http://maven.apache.org/POM/4.0.0" xmlns:xsi="http://www.w3.org/2001/XMLSchema-instance"
xsi:schemaLocation="http://maven.apache.org/POM/4.0.0 http://maven.apache.org/maven-v4_0_0.xsd">
<modelVersion>4.0.0</modelVersion>
<groupId>org.activitiinactioni</groupId>
<artifactId>Activiti Examples</artifactId>
<version>0.5-SNAPSHOT</version>
<packaging>jar</packaging>
<name>BPMN 2.0 with Activiti - Examples</name>

<properties>
<activiti-version>5.0</activiti-version>
<spring-version>3.0.3.RELEASE</spring-version>
</properties>

<dependencies>
<dependency>
<groupId>org.activiti</groupId>
<artifactId>activiti-engine</artifactId>
<version>${activiti-version}</version>
</dependency>
<dependency>
<groupId>org.activiti</groupId>
<artifactId>activiti-spring</artifactId>
<version>${activiti-version}</version>
</dependency>
<dependency>
<groupId>hsqldb</groupId>
<artifactId>hsqldb</artifactId>
<version>1.8.0.7</version>
</dependency>
<dependency>
<groupId>com.h2database</groupId>
<artifactId>h2</artifactId>
<version>1.2.132</version>
</dependency>
<dependency>
<groupId>org.codehaus.groovy</groupId>
<artifactId>groovy</artifactId>
<version>1.7.5</version>
</dependency>
<dependency>
<groupId>org.subethamail</groupId>
<artifactId>subethasmtp</artifactId>
<version>3.1.4</version>
</dependency>
<dependency>
<groupId>org.slf4j</groupId>
<artifactId>slf4j-simple</artifactId>
<version>1.6.1</version>
</dependency>
<dependency>
<groupId>org.hibernate</groupId>
<artifactId>hibernate-entitymanager</artifactId>
<version>3.6.0.Final</version>
</dependency>
<dependency>
<groupId>org.springframework</groupId>
<artifactId>spring-context</artifactId>
<version>${spring-version}</version>
</dependency>
<dependency>
<groupId>org.springframework</groupId>
<artifactId>spring-jdbc</artifactId>
<version>${spring-version}</version>
</dependency>
<dependency>
<groupId>org.springframework</groupId>
<artifactId>spring-tx</artifactId>
<version>${spring-version}</version>
</dependency>
<dependency>
<groupId>org.springframework</groupId>
<artifactId>spring-test</artifactId>
<version>${spring-version}</version>
</dependency>
<dependency>
<groupId>junit</groupId>
<artifactId>junit</artifactId>
<version>4.8.1</version>
</dependency>
</dependencies>

<repositories>
<repository>
<id>Activiti</id>
<url>http://maven.alfresco.com/nexus/content/repositories/activiti</url>
</repository>
<repository>
<id>jboss-public-repository-group</id>
<name>JBoss Public Maven Repository Group</name>
<url>https://repository.jboss.org/nexus/content/groups/public-jboss/</url>
</repository>
</repositories>

<build>
<plugins>
<plugin>
<groupId>org.apache.maven.plugins</groupId>
<artifactId>maven-compiler-plugin</artifactId>
<version>2.3.2</version>
<configuration>
<source>1.6</source>
<target>1.6</target>
</configuration>
</plugin>
</plugins>
</build>
</project>

Supersize Activiti with Mule ESB and Apache Camel

$
0
0
The Activiti Engine provides a powerful Java API that makes it very easy to for example deploy process definitions, implement custom logic and unit test your processes. When you want to connect remotely to the Activiti Engine there's a REST API to communicate with the process engine. But what if you want to start a new process instance by sending a JMS message, or invoke a web service from a BPMN 2.0 process?

By default, the BPMN 2.0 specification provides support for doing web service calls via a specific web service task. The Activiti Engine also provides support for a web service task, but it may be a bit cumbersome to implement due to the large amount of additional XML elements needed. And this task does only SOAP web service calls, so JMS messages etc.

Luckily the Activiti community comes to the rescue. In the next release of Activiti you'll see two interesting new Activiti modules, one for Mule ESB integration and one for Apache Camel integration. A big thumbs up to Esteban (Mule ESB contribution) and Maciek (Apache Camel contribution). But if you already want to play around, just checkout the Activiti source code at http://svn.codehaus.org/activiti/. Let's walk through some simple examples to get a good overview of these modules.

Mule ESB
Let's start with the Mule ESB module. With the Activiti Mule ESB integration we have two options of deployment. Deployment option one is to run both Mule ESB as well as the Activiti Engine in one Spring container and the communication between Mule ESB and the Activiti Engine uses the Activiti Java API. The second deployment option is to run Mule ESB standalone and let Mule ESB communicate with the Activiti Engine through the REST API. The only difference is the Activiti connector, which is defined in the Mule configuration.

Embedded configuration:

<mule xmlns="http://www.mulesoft.org/schema/mule/core"
xmlns:activiti="http://www.mulesoft.org/schema/mule/activiti-embedded">

<activiti:connector name="actServer"
repositoryService-ref="repositoryService"
runtimeService-ref="runtimeService"
taskService-ref="taskService"
historyService-ref="historyService" />

<!-- Rest of the code shown in the next snippets -->

</mule>
Remote configuration:

<mule xmlns="http://www.mulesoft.org/schema/mule/core"
xmlns:activiti="http://www.mulesoft.org/schema/mule/activiti-remote"

<activiti:connector name="actServer"
activitiServerURL="http://localhost:8080/activiti-rest/service/"
username="kermit"
password="kermit" />

</mule>
The embedded configuration references Spring beans defined in the Activiti Engine Spring configuration for the Mule ESB to communicate with the Activiti Engine. The remote configuration defines the location of the REST API and defines the authentication parameters so the Mule ESB can use the Activiti REST API to talk with the Activiti Engine.

Okay that's nice, but now let's actually do something with this Activiti connector. Let's start a new process instance of a very simple BPMN 2.0 process from a JMS message. Now we have setup the Activiti connector infrastructure this is really easy.

<jms:activemq-connector name="jmsConnector" brokerURL="tcp://localhost:61616"/>

<flow name="MuleCreateProcess">
<jms:inbound-endpoint queue="in.create" />
<logger message="Received message #[payload]" level="INFO" />
<activiti:create-process parametersExpression="#[payload]" />
<jms:outbound-endpoint queue="out.create" />
</flow>

When a message is sent to the in.create queue, the message is first logged with the #[payload] expression. Then the Mule ESB Activiti module is invoked to create a new process instance. In this example, the JMS message is expected to be a MapMessage and the Map is retrieved to get the process parameters with the parametersExpression. To be able to start a process instance, we have to specify a processDefinitionKey property in the MapMessage. The additional properties specified in the MapMessage are all translated to process variables. Finally the process instance gets created and the newly create process instance object is sent to another JMS queue (out.create). This JMS ObjectMessage contains for example the process instance ID that can be used to retrieve things like process variables etc.

To test this example we need a bit of JMS plumbing code. So if you're interested in running the code example yourself please look at the Google code repository. In addition to creating new process instances, you can also set new process variables, signal a process instance etc. For a full overview you can read the Mule ESB Activiti documentation.

In addition to communicating with the Activiti Engine from the Mule ESB, it's also possible to send messages from a BPMN process to the Mule ESB. This opens up possibilities to send for example JMS messages, or advanced integration logic from a BPMN process. The current implementation is limited to the embedded mode for this piece of functionality, but there's no reason why this can't be expanded to also supporting the standalone or remote setup. Let's look at a simple process containing a Mule send task.

<definitions xmlns="http://www.omg.org/spec/BPMN/20100524/MODEL"
xmlns:activiti="http://activiti.org/bpmn"
targetNamespace="http://www.bpmnwithactiviti.org">

<process id="helloWorldMule">
<startEvent id="theStart" />
<sequenceFlow sourceRef="theStart" targetRef="sendMule" />
<sendTask id="sendMule" activiti:type="mule">
<extensionElements>
<activiti:field name="endpointUrl">
<activiti:string>vm://in
</activiti:field>
<activiti:field name="language">
<activiti:string>juel
</activiti:field>
<activiti:field name="payloadExpression">
<activiti:expression>${processVariable1}
</activiti:field>
<activiti:field name="resultVariable">
<activiti:string>processVariable2
</activiti:field>
</extensionElements>
</sendTask>
<sequenceFlow sourceRef="sendMule" targetRef="theEnd" />
<endEvent id="theEnd" />
</process>
</definitions>

In this example we sent a message to the in queue of the JVM transport in Mule (which is a JVM messaging component). The message contains the value of the processVariable1 process variable and the response (we use a request-response exchange pattern in the Mule flow configuration) is written to a new process variable named processVariable2. The Mule flow configuration listing to the in JVM queue looks like this.

<flow name="MuleHello">
<vm:inbound-endpoint path="in" exchange-pattern="request-response" />
<logger message="Received message #[payload]" level="INFO" />
<script:transformer>
<script:script engine="groovy">return 'world'
</script:transformer>
</flow>

The message is logged and a very simple Groovy script returns a response message with the value of 'world'. This shows how easy it is to send a message from a BPMN process to the Mule ESB and you can imagine that you can implement a lot of powerful integration logic that way. Let's take a look at the Apache Camel implementation.

Apache Camel
What a luxury we have in the Activiti project. Besides the powerful integration with Mule ESB, we have another great and widely used integration framework available to be used: Apache Camel. You understand that both Mule ESB as well as Apache Camel are capable of doing lots of similar integration logic. There are however also enough differences, and we'll highlight some of them by showing some examples.

One of the first differences is that the Camel integration always runs embedded with the Activiti Engine in the same Spring configuration. So you have to define a Spring XML configuration that includes an Activiti Engine config and a Camel context config. To be able to start new process instances from Camel the deployed process definition key is made available in the Camel context as you can see in the following snippet.

<beans xmlns="http://www.springframework.org/schema/beans"
xmlns:camel="http://camel.apache.org/schema/spring">

<bean id="activemq" class="org.apache.activemq.camel.component.ActiveMQComponent">
<property name="brokerURL" value="tcp://localhost:61616" />
</bean>

<bean id="camel" class="org.activiti.camel.CamelBehaviour">
<constructor-arg index="0">
<list>
<bean class="org.activiti.camel.SimpleContextProvider">
<constructor-arg index="0" value="helloCamelProcess" />
<constructor-arg index="1" ref="camelProcess" />
</bean>
</list>
</constructor-arg>
</bean>

<camelContext id="camelProcess" xmlns="http://camel.apache.org/schema/spring">
<packageScan>
<package>org.bpmnwithactiviti.blog.camel
</packageScan>
</camelContext>
</beans>

In this configuration we create a connection to an ActiveMQ broker we'll use later on. Then a SimpleContextProvider is defined that connects a deployed process definition on the Activiti Engine to a Camel context. You can define a list of SimpleContextProviders for each process definition that you want to connect to a Camel context. In the last part a Camel context is defined that scans for RouteBuilder classes in the configured package.

With the infrastructure in place we can now define integration logic in a Camel RouteBuilder class.

public class CamelHelloRoute extends RouteBuilder {

@Override
public void configure() throws Exception {

from("activemq:in.create")
.log(LoggingLevel.INFO, "Received message ${body}")
.to("activiti:helloCamelProcess")
.log(LoggingLevel.INFO, "Received message ${body}")
.to("activemq:out.create");

from("activiti:helloCamelProcess:serviceTask1")
.log(LoggingLevel.INFO, "Received message on service task ${property.var1}")
.setProperty("var2").constant("world")
.setBody().properties();
}
}

There are two so-called Camel routes defined in this RouteBuilder class. The first Camel route listens for new messages arriving at the in.create ActiveMQ queue. The message is logged and a new instance of the helloCamelProcess process definition is created and the process instance id is logged and sent to the out.create ActiveMQ queue. So now we can sent a JMS MapMessage to the in.create queue and all entries of the map are set as new process variables on the new process instance of the helloCamelProcess and the process instance id is sent to the out.create queue.

In the second route the Java service task logic of the helloCamelProcess is implemented (we'll see in a bit how this is implemented in BPMN 2.0 XML). First the process variable var1 is logged and then a new process variable var2 is created on the process instance. Of course we can implement far more complex integration logic here, like sending a JMS message or invoking a web service call.

Now let's look how the logic of the Java service task (serviceTask1) is delegated to this Camel route.

<definitions targetnamespace="http://www.bpmnwithactiviti.org"
xmlns:activiti="http://activiti.org/bpmn"
xmlns="http://www.omg.org/spec/BPMN/20100524/MODEL">

<process id="helloCamelProcess">
<startevent id="start">
<sequenceflow sourceref="start" targetref="serviceTask1">
<servicetask activiti:delegateexpression="${camel}" id="serviceTask1">
<sequenceflow sourceref="serviceTask1" targetref="waitState">
<receivetask id="waitState">
<sequenceflow sourceref="waitState" targetref="theEnd">
<endevent id="theEnd">
</process>
</definitions>

As you can see the Camel route delegation is really simple. We only have to reference the CamelBehavior Spring bean (camel) we defined earlier. In the Google code repository you can find a unit test to run the full example.

Conclusion
With the availability of both integration modules there is a wide range of integration options that can be leveraged. The BPMN 2.0 specification already supported the web service task, the Activiti Engine added a powerful Java service task, but now the whole range of transports and enterprise integration patterns are available for you to be used. The only limitation is your imagination ;-).

Activiti Eclipse Designer 5.7.0 release

$
0
0
A new version of the Activiti Eclipse Designer has been released, it's version 5.7.0. This new version contains of course a number of bug fixes, but also some cool new edit features. You can now create new diagrams in just a couple of seconds by using the new "add element" functionality. In addition you can change the type of a task or gateway without the need of deleting and adding a new element.

Because it's difficult to talk about this new functionality using just text, I created a couple of video's. Besides the new functionality, the video's also show the basics of importing a diagram from the Activiti Modeler into the Activiti Designer and how to deploy a process from the Activiti Designer to the Activiti Engine.

Let's start with modeling a process with the Activiti Modeler and import it into the Activiti Designer.


Now let's design the same loan request process, but now solely using the Activiti Designer and the new quick edit capabilities.


In addition to the quick edit functionality, there's also a new capability of changing the type of a BPMN element. Let's see that in action.


And now deploy the loan request process from the Activiti Designer to the Activiti Engine using Activiti Probe.


Hope you will enjoy these new capabilities.

Activiti Modeler: Getting started part 1

$
0
0
Yesterday we pushed the new Activiti Modeler source code to the Activiti Github repository as part of the Activiti Explorer web application. In addition an alpha version of the new Activiti Modeler (as part of the Activiti Explorer) application was released here. In a number of getting started articles I'll explain the new functionality in more detail.

In this first part of the Activiti Modeler getting started article series, we'll explore the main functionality and we start off we a bit of history.

As you know we had an Activiti Modeler component as part of the Activiti project from the start. This Modeler was donated by Signavio as part of the Signavio Core Components project. But as the project site states now, this project was not maintained anymore since 2011. Because we think a BPMN 2.0 web modeler with support for the Activiti extensions is of great value to the Activiti community, a couple of months ago I decided to fork the Signavio Core Components project and build a new version myself. And after a couple of iterations this now resulted in a code merge with the Activiti Explorer project and a first alpha release for you to try out the new web modeler.

You can download the alpha WAR from the Activiti download page and copy it to your Tomcat servlet container or another application server. This application includes the Activiti Explorer app extended with the Activiti Modeler functionality. This alpha release uses an in-memory database for the Activiti Engine as well as for the model repository. To change this you can configure another datasource in the db.properties (for the Activiti Engine) and the META-INF/persistence.xml (for the model repository, only 1 table at the moment).

When you open the web application you'll see the login page of the Activiti Explorer application. Please note that for the Activiti Modeler functionality only one of the latest versions of Chrome or Firefox are supported. You'll notice the changes when you click on the process link at the top of the Activiti Explorer web application.


You now see a new Model workspace link in the web application. The table contains all the models available in your model repository. You can create new models, and edit and delete existing models. In addition, you can deploy a model directly to the Activiti Engine. Another nice feature is to open an already deployed process definition in the Activiti Modeler. You can do this via the Deployed process definitions link.


There's a new button name Convert to editable model (only enabled when the deployed process definition has BPMN DI information) and when you confirm the popup dialog, a new model is created in the repository and the Activiti Modeler is opened. Let's do this for the example Simple approval process.

As you can see, the palette contains already most of the Activiti supported elements. In addition you can open the attributes panel on the right side and you can see the attributes that you can configure for every BPMN element.

In the next part we'll discuss how to create a new process model using the new Activiti Modeler and how to deploy it to the Activiti Engine.

Activiti thanks Tom Baeyens

$
0
0
To put the message of this blog post right at ya, Tom has decided to step down as project lead of the Activiti project. He started the project back in March 2010 together with Joram Barrez at Alfresco and in (almost) three years we've seen it grow enormously, way more than we ever dreamed for. I believe it's fair to say Activiti is, and will remain, the #1 open source BPM and workflow engine in the Java landscape.

But where does this leave the Activiti project? Although we are sad to see Tom leave, this doesn't mean in any way that there will be a slowdown in the Activiti project. On the contrary, we'll release the 5.11 version next week (5 December) and we have a lot of nice features coming up for the 5.12 release. Alfresco will keep investing into Activiti as it always has. Our community and their contributions are now at a height that many other open source projects only hope to reach one day. The Alfresco workflow team will remain 200% focused on the Activiti project. Joram remains Activiti core developer and will be doing Activiti evangelism. Frederik (our new dad on the team) will also remain core developer and Tijs will take on the job as Activiti project lead (after doing a co-lead already for a couple of months).

But back to the reason of writing this blog post. Tom has been a big disruptor in the space of BPM engines. When he started the jBPM project on SourceForge in 2002, he had no idea what kind of impact this would be having. jBPM became a big success and when Tom joined Alfresco he repeated this success with the Activiti project. He was able to build a strong community with supporting companies like Camunda, SpringSource, MuleSoft and FuseSource and build a rock-solid BPMN engine.

And now the time has come for him to seek for new challenges. We want to thank Tom for everything he did for open source BPM and Activiti in particular. And we're really interested in the new challenges he'll be taken on. So Tom all the best and a big thank you for all your work for Activiti!

Tijs, Joram and Frederik

Activiti 5.11 released

$
0
0
Activiti 5.11 has been released today (5 december 2012). This release contains a lot of new features and a lot of bug fixes. Be sure to watch new blog posts from the Activiti team in the coming weeks as we'll blog about these new features. The main highlights of the 5.11 release are:

  • Added Activiti Modeler to the Activiti Explorer web application
  • Removed buggy demo script and replaced with simpler distribution
  • Support for doing queries that are not out-of-the-box possible with the query api (called 'native queries')
  • Enhanced ability to query for history variable values
  • Improved functionality to suspend and activate process definitions and instances
  • Improved Activiti QA and added DB2 and MSSQL servers
  • Added support for using a service call in a Java delegate (see here for more details)
  • Lots of bug fixes
Grab the 5.11 distribution from the Activiti download page. Note that we removed the demo script and just provide the Explorer and REST web applications as WAR files in the distribution. In addition, the database scripts are now also part of the distribution in the database folder.

We hope you enjoy the new Activiti 5.11 release! The Designer 5.11 release we'll follow in a couple of weeks.

The Activiti team

    Implement parallel execution in Activiti

    $
    0
    0
    Running service tasks in parallel in Activiti is an area where we've seen a lot of confusion. In this article I want to show you how this works using the parallel gateway and alternatively how you can do this using the Activiti / Apache Camel integration.

    Let's consider a very simple process using the parallel gateway.


    When we don't specify any additional attribute to the parallel tasks in this simple process definition Activiti will first execute Parallel task 1 (let's assume that one is defined first in the BPMN XML), and after that task has been completed it will execute Parallel task 2. So although we are using the parallel gateway the service tasks are executed in sequence. This is to prevent issues with variable updates and troublesome thread syncing logic.

    But if we really want to execute the service tasks in parallel there are other possibilities. The first one is to define both tasks as asynchronous tasks using the Activiti async attribute. Now the parallel tasks are initiated via the job executor and will really run in parallel. Well you might think that.  Actually, they are again run in sequence because we've built-in the concept of exclusive jobs in the Activiti Engine (see the Activiti userguide). This will by default prevent jobs of the same process instance to run at the same time. So by default jobs of the same process instance will run in sequence.

    What we can do is disable the exclusive jobs feature by adding an activiti:exclusive="false" attribute to both parallel tasks in our example process. This will run both asynchronous parallel tasks together and finally we have our parallel execution behavior. But....  now we'll run into the following error message:

    ExecutionEntity[4] was updated by another transaction concurrently

    Because both service tasks run in parallel they both trigger the same parallel join logic, but in a different transaction. And because both service tasks can complete around the same time, they both will try to execute the parallel gateway join logic. And this will throw an optimistic locking exception.

    But luckily there's a good solution to this problem. When we'll use the Apache Camel integration we can use the queuing logic of Apache Camel to create the parallel execution behavior for us. First we have to adapt our simple process definition a bit.


    As you can see there's now a receive task following both parallel tasks. With the following service task definition we can invoke a Camel context from a service task:

    <serviceTask id="serviceTaskAsync1" activiti:delegateExpression="${camel}"/>

    Of course we need to define the camel Spring bean in the Engine configuration so it can find it. We can do that according to the following configuration:

    <camelContext id="camelProcess" xmlns="http://camel.apache.org/schema/spring">
      <packageScan>
        <package>org.activiti.camel.route</package>
      </packageScan>

    </camelContext>

    <bean id="camel" class="org.activiti.camel.CamelBehaviour">
      <constructor-arg index="0">
        <list>
          <bean class="org.activiti.camel.SimpleContextProvider">
            <constructor-arg index="0" value="asyncCamelProcess"/>
            <constructor-arg index="1" ref="camelProcess"/>
          </bean>
        </list>
      </constructor-arg>

    </bean>

    The camel Spring bean defines an implementation of the ActivityBehavior interface and connects the Camel context (camelProcess) to the process definition key (asyncCamelProcess). Now what's left is the definition of the Camel route that's read by the Camel context by scanning the org.activiti.camel.route package.

    public class AsyncCamelRoute extends RouteBuilder {
     

     @Override
     public void configure() throws Exception {
      

      from("activiti:asyncCamelProcess:serviceTask1?copyVariablesToProperties=true")
        .setHeader("destination", constant("activiti:asyncCamelProcess:receive1"))
        .to("seda:asyncQueue");

      from("seda:asyncQueue")
        .to("bean:sleepBean?method=sleep")
        .to("seda:receiveQueue");
       
      from("activiti:asyncCamelProcess:serviceTask2?copyVariablesToProperties=true")

        .setHeader("destination", constant("activiti:asyncCamelProcess:receive2"))
        .to("seda:asyncQueue2");
      

      from("seda:asyncQueue2")
        .to("bean:sleepBean?method=sleep")
        .to("seda:receiveQueue");

      from("seda:receiveQueue").recipientList(header("destination"));
     }
    }


    This might seem a bit complex at first sight, but when you take some time to read it it's actually quite simple. The first route definition defines that from the first parallel service task we copy all process variables to the Camel message properties and sent it to the in-memory asyncQueue using the Camel SEDA connector. And we define a header that sets the destination property to the receive1 task reference.

    We do the same for the second parallel service task and change the queue to asyncQueue2 and set the destination to receive2 task. Then in the third route the messages from the asyncQueue are sent to a Java bean (in specific to the sleep method) and the result object of that method is sent to the receiveQueue.

    The recipientList invocation tells Camel to sent a message receive on the receiveQueue to the value in the destination header property. Because the SEDA connector by default processes 1 message at a time we are sure that the signaling of the receive1 and receive2 tasks are always done in sequence and we are sure that we don't run into optimistic locking exceptions.

    So by using Activiti together with Camel we can implement real parallel execution in a safe manner without the need to write a lot of code.  If you want to test a bit with this example yourself you can checkout the activiti-camel module in our Github repository and execute the AsyncProcessTest in that project.

    Hope this has provided some more insight into the use of the parallel gateway and parallel execution in the Activiti Engine.

    Activiti Designer 5.11.0 released

    $
    0
    0
    Activiti Designer 5.11.0 is released today. You can install the plugin via the http://activiti.org/designer/update repository or download the package from the http://activiti.org/designer/archived site. You can also find the plugin jars in our Maven repository https://maven.alfresco.com/nexus/content/repositories/activiti-releases/org/activiti/designer/

    This release includes a big refactoring of the BPMN parsing and export logic and the underlying BPMN POJO model. Since we have the activiti-bpmn-model and activiti-bpmn-converter projects in the Activiti project we now have one foundation for parsing for the Activiti Engine, Modeler and Designer. The Modeler and Designer in addition also use the BPMN XML export logic.

    In addition to this refactoring the 5.11.0 release also contains a couple of new features (message boundary events, made custom service tasks a first class citizen so you can add execution listeners and other service task functionality), and some bug fixes.

    Because the foundation of the Designer is now replaced with the Activiti BPMN model and converter projects we are very eager to have you test this version and report any bugs found in our JIRA. Hope you'll enjoy using this new release.

    Activiti in Action updates (part 1)

    $
    0
    0
    Hi all,

    One of the difficulties with writing a book is that it's quite hard to provide updates when it's printed. The great thing about Activiti is that it's based on the BPMN standard and in that respect a large part of the Activiti in Action book describes functionality like it was available in version 5.9, but also still in 5.11 and the upcoming 5.12 release. But of course some parts have changed, and that's why I decided to publish a series of articles about these changes so you can use these articles together with the book to learn about the latest releases of Activiti.

    In this first article I want to focus on the installation procedure and Activiti's main components.

    Installation procedure

    The installation of Activiti has changed quite a bit in Activiti 5.11. In the 5.11 release we decided that it would be better to get rid of all setup scripts, because they were causing a lot of environment specific issues without providing a lot of help. In the book I reference the use of ant demo.start a couple of times to start the H2 database. That script is not available anymore starting from the 5.11 release. So let's walk through the new installation procedure of Activiti (also described in the Activiti userguide).

    1.Download the Activiti distribution from the Activiti download page.

    2. Unzip the distribution to for example: c:\activiti (Windows), /user/local/activiti(Linux/Mac)

    3. You should now have the following directory content:


    The database folder holds the database scripts that can be used to create the database schema or upgrade to the 5.11 schema for your database. The docs contain the userguide, javadocs, and xsd files. The libs folder has all the Activiti modules in JAR files and the wars folder has the Explorer and REST WAR files. So no scripts folder anymore to create a development environment. But that doesn't mean that things got harder to get started, on the contrary.

    4. Download a Tomcat 6 or 7 distribution if you don't have one already. Copy the activiti-explorer.war and activiti-rest.war (if you want to use the REST interface) files to the Tomcat webapps folder.

    5. Note that the Explorer application contains examples and an in-memory H2 database to quickly get started. So when you start the Tomcat server and open your browser at http://localhost:8080/activiti-explorer you can get started without additional installation steps. For the REST application this is not true, since that is referencing a standalone H2 database by default. So to use the REST application you first have to install the H2 database like described in the following steps.

    6. Download H2 from the H2 download page, and follow the installer steps or in case of a platform independent ZIP, unzip the contents to the folder of your preference.

    7. To start the H2 database server you can start it via the start menu for Windows (see the h2 quick start page)  or use the following command on Linux and Mac from the H2 bin folder:
    java -jar h2*.jar

    8. Now the H2 standalone database is running and you can also use the Activiti REST web application.

    But note that for just running the Explorer web application, you don't even need a H2 standalone database. You only need to be aware that every time you restart the Tomcat server, previous changes are made undone.

    Activiti main component changes

    The main components of the Activiti project, the Engine, Designer, Explorer and REST application are still there. The main difference is the addition of the Modeler component (see also my previous post about the Modeler announcement). In the book we use the Signavio Modeler component that you how to download and install separately. That's not necessary anymore, the Modeler is part of the Explorer web application in the 5.11 release. The modeling of processes is still very similar to the description in the book. And when you would like to import a Modeler process into the Designer you can use the export action in the Modeler workspace (in the Processes section of the Explorer) to download the BPMN 2.0 XML file.


    In the next part of this Activiti in Action update series I'll focus on smaller differences such as the history configuration and SLf4j logging (coming in 5.12). But I also welcome feedback about which parts I should highlight on.

    Process diagrams community contribution

    $
    0
    0
    It's great to see that the number of community contributions is rising for Activiti lately. One great addition you'll see in Activiti 5.12 is the Javascript process diagrams component created by Dmitry Farafonov. You can already check out this component by running the latest Explorer web application from the Github master.

    The process diagram component uses the Raphaël framework to draw a process definition image based on the BPMN DI information in the process definition XML. In addition, the component is capable of showing the current status of a process instance.

    Until 5.11 we only supported a static process image and a generated process instance image. But with the addition of the process diagram component we don't need to server-side generate a custom process instance image. And there's now the option to add more interaction in the process image, to for example show more information about a specific activity in the process definition.

    The review sales lead example process of the Activiti Explorer looks like this in the process diagram component:

    The current status of a process instance of the review sales lead process is drawn like this:


    In addition to showing the process diagram as part of the Activiti Explorer, it's also very easy to only show the process diagram itself, for example to include it in another application. With the following URL you can retrieve the process image of the sales review process for example:

    http://localhost:8080/activiti-explorer/diagram-viewer/index.html?processDefinitionId=reviewSaledLead:1:36

    And to also highlight the current status of a process instance, just add a processInstanceId request parameter like this:

    http://localhost:8080/activiti-explorer/diagram-viewer/index.html?processDefinitionId=reviewSaledLead:1:36&amp;processInstanceId=41

    So a big thanks to Dmitry Farafonov for contributing this component to Activiti and I hope to see more contributions coming!

    Activiti 5.12 released

    $
    0
    0
    Yesterday, 5 March 2013 we released Activiti 5.12. This release is really packed with new features and improvements. These are the highlights:
    • Added new javascript-based diagram viewer to Explorer (thanks to Dmitry Farafonov)
    • Unified the BPMN parser and model for the Engine, Modeler and Designer
    • Added Activiti Kickstart to the Explorer to quickly create processes without deep BPMN knowledge
    • Simplified and extended the Activiti Camel module (thanks to Ryan Johnston)
    • Added first stage of reporting functionality to the Explorer via "reporting processes"
    • Added auto-layout module for Kickstart and BPMN import in Modeler (TBD) and Designer
    • Added script task and execution listeners
    • Lots of bug fixes
    For a full list of improvements, features, bugs you look at the following JIRA issues.
    In the next weeks we will blog in more detail about new features and improvements. Have fun!

    Activiti 5.12 JDK 6 bugfix

    $
    0
    0
    Although we are doing a lot of QA for every release of Activiti, we didn't fully test the Explorer functionality on JDK 6. In our Jenkins QA most of the jobs are running against JDK 7 for all our supported databases. But we also have a JDK 6 job that executes our full test suite to make sure we are JDK 6 compliant. But this doesn't include the Explorer app (yet). So due to a Xalan JAR and known XML JDK 6 issues the Explorer app didn't parse BPMN 2.0 XML files anymore without exceptions.

    Thanks to our community we got notices of this very quickly and we started with fixing it immediately. For JDK 6 we had to disable safe BPMN 2.0 parsing (http://activiti.org/userguide/index.html#advanced.safe.bpmn.xml), but this can be easily switched on for JDK 7. In addition we also fixed an issue with the Activiti Kickstart module to deploy created process models (You can find this experimental functionality when creating a new model in the model workspace and choosing for the table editor BTW).

    So now there's a new Activiti 5.12 release waiting for you on our download page, with a working Explorer application on JDK 6 and 7, Tomcat, JBoss 7 and the latest Glassfish. Also the Maven artifacts for the Engine, Converter and Explorer are updated. So make sure you remove any existing Activiti 5.12 JAR from your Maven repository so you get the latest JARs.

    Thanks again for bringing up the JDK 6 issue so quickly!

    Activiti forked

    $
    0
    0
    I'm feeling a bit sad this morning with the fork of Activiti by Camunda. As you all know Camunda has been a community member of the Activiti project almost since the beginning and they made quite a number of good contributions over the years.

    There are a couple of reasons that make me sad, one is that we didn't have any discussions recently and we didn't have any argument with each other. So we were very surprised when a couple of weeks ago we did a Skype call to hear that they decided to leave the Activiti community and start their own open source project (which is basically Activiti).

    The second reason is from an open source standpoint, what's the gain to get here? The additional application server components would have fitted with the Activiti project also very well. So now we have two projects with the same codebase, which have to be maintained and futher developed. So twice the work without any real benefit for the open source BPM community.

    The third and last reason is on a personal level. The Camunda developers are great people to work with and to have in the Activiti community. And it's sad to see them leaving for reasons I don't know or understand.

    But enough said about that. Where does this leave the Activiti project? Well, as you saw in the recent 5.12 release we are more alive then ever before. We have a great community and a good number of contributors. New features for the 5.13, like a feature-complete REST API, a Javascript SDK, easier setup and administration are already under development and we'll release the Activiti Designer 5.12 very soon. So we'll keep on going strong and keep improving the Activiti components for our great community.

    Activiti Designer 5.12.0

    $
    0
    0
    I'm happy to announce the availability of the new 5.12.0 release of the Activiti Designer. This release contains a lot of usability improvements and re-introduces the import feature for diagrams that don't contain BPMN DI information and the linking of processes that use call activities. And of course this release contains also several bug fixes of issues reported in the Activiti JIRA.

    Import of diagrams without BPMN DI

    In one of the earlier versions of the Designer we had support to import BPMN XML files without BPMN DI information. We had to remove this feature after a big refactoring, but now it's back again! In the Activiti project we introduced a module name activiti-bpmn-layout which contains logic to do auto-layout for the process elements in a process definition and that's the module we're using in the Designer to create a graphical representation of a process definition which doesn't contain BPMN DI information. As you'll see, the auto-layout is not perfect, but it can create a very decent graphical view of most process definitions. An example is shown in the following screenshot.


    Linking of processes for call activities

    When you're using call activities it's very handy to be able to open the sub process with a simple button click, without the need to browse the explorer and find the sub process file yourself. So that's we added in this release of the Designer (thanks to Heiko). You can select the sub process from a list of processes that are retrieved from your workspace. When you have selected a sub process and the id of that process is unique in your workspace, you can now open the sub process with a simple button click (see the screenshot below).


    Usability improvements

    When you were browsing through the properties of an element in your process you probably have noticed that the Designer asks you to save your changes when closing the diagram later on. So event if you didn't make changes, the diagram was dirty. This is now fixed in this release. In addition, you had to define signals and messages separately on a process level and then you could select the specific signal or message event in for example a boundary or intermediary event. Because Activiti only requires you to define a signal or message id that can be used to identify the event, you can now directly fill-in this simple id in the boundary or intermediary event. No need to do this at a process level anymore. And you'll see a lot more bug fixes are part of this release.

    Enjoy!

    You can get the 5.12.0 release from the http://activiti.org/designer/update update site or from the http://activiti.org/designer/archived archive site. And of course, all plugin projects are also available in the Activiti Maven repository. Hope you'll enjoy this release!

    Using Camel routes in Activiti made really easy

    $
    0
    0
    As you know Activiti contained a Camel module already for quite some time. And in previous blog posts I showed it provides a really powerful combination of two great frameworks. In the Activiti 5.12 release we made the usage of Camel routes in Activiti even simpler (also thanks to Ryan for his community contribution here).

    Before the 5.12 release you had to define a CamelBehaviour bean with a list of SimpleContextProvider beans to establish a relationship between a process definition and a camel context, like the following code snippet:

    This is gone now in Activiti 5.12. By default the Activiti Engine will try to resolve a Camel context bean with the name "camelContext". And if you don't want to use this default Camel context you can override it in the Camel service task like this:
    And in the this code snippet you also see another change from the previous releases. You can now invoke a Camel route by defining a service task with the type attribute value of "camel" instead of having to use a delegateExpression attribute.

    So now let's look at a simple example of how to use the Activiti Camel module. Just add a Camel context bean definition to an Activiti Spring configuration file like this:

    This will make any Camel route class in the package org.activiti.camel.route available to invoke from an Activiti process definition. Now let's implement a very simple process definition that invokes a Camel route and waits for a response message before ending the instance.
    This corresponds to the following process definition XML:

    So now we only need to define a couple of Camel routes to get this example fully implemented:

    When the message is off-loaded to a SEDA queue in Camel the Activiti service task will complete and move on to the next receive task. In the meantime you can let Camel execute the integration logic you need, like invoking a REST or web service or invoke a legacy application via another protocol. When Camel gets a response back from the request, it will invoke the receive task in the Activiti Engine and the instance will be completed. Camel is able to find the right process instance, because the process instance id is added to the header of the Camel message by the Camel service task.

    As you can see, it's really easy now to use Activiti and Camel together. Hope you'll see the opportunity of this and create some powerful process and integration solutions ;-)

    Activiti 5.13 released

    $
    0
    0
    Today, we have released Activiti 5.13. This release includes a big effort to improve our REST API. It now offers the same functionality as the Java API! We invite you to look at our new REST API in our userguide http://www.activiti.org/userguide/index.html . For backwards compatibility we also included our old REST API in the activiti-rest.war, but we recommend to use the new API when possible.

    In addition to the REST API, this release also includes an out-of-the-box LDAP user and group manager implementation and it's now possible to include process and task variables in the result of process and task queries (both runtime as well as history). Of course we also include a lot of bug fixes and small improvements.

    We hope you'll enjoy this new release and the new REST API in specific.

    The Activiti team
    Viewing all 55 articles
    Browse latest View live